
How to setup 2FA On Linux SSH Login

  This is a simple setup guide to enabling Two Factor Authentication (2FA) on Linux SSH login. I this article I wont go deep into setup and issues that I have faced when implementing this. First thing is first Update your system first. I have used Ubuntu 20.04 and it is always up to date. To enable 2FA you need to install google authenticator modules sudo apt install libpam-google-authenticator Configuration for PAM and SSHD Add the the following line to /etc/pam.d/sshd and After adding this line please restart the sshd services.  auth required pam_google_authenticator.so Go to /etc/ssh/sshd_config and check if the following line exist. Default value will be "no" so change it to "yes" to activate.  ChallengeResponseAuthentication yes Configuration for Authenticator In the terminal run google authenticator command It will ask few things to acknowledge by user. Details you can see from the below video. Once this part is done you are ready to use the 2FA in ubuntu. T...

A Keypad with a brain


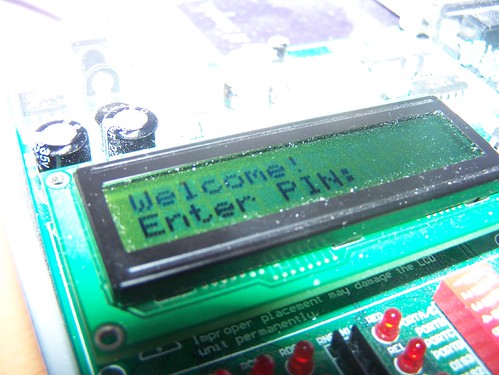
As you all know in my previous post i have talked about an keypad which was designing. Finally almost the hard part is over. This keypad or controller based on three to four parts.
First is keypad part: Its 16 key keypad which i have design and implemented. Its 16 push buttons connected to the input shift register. When the user operates a button, the shifts will change it to serial format and fed to micro controller.

Second part is input shift register: It handles all the button activities. which means it will convert the button input to serial format. Actually the shits are parallel to serial or a MUX.

Third part is the brain: Brain of the this circuit does all the computing. The code that me and my friend whoknowz wrote was doing the conversion part to determine which button was pressed. Its kinda "AI" part. It was hard at first but later was easy to decode the whole serial part. The brain stores the password of this system and when the user insert the pass it will display on the LCD the feedback result. if the password is correct it will call to a next level.


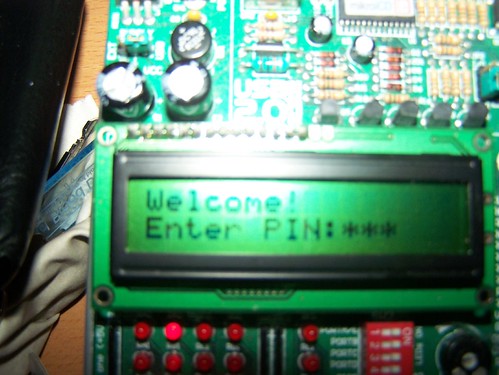
Later i wrote the code for controlling lights, relays etc. Without the authentication you cant use the system. Later i will expand this project and include an voice chip to give voice command. like "WELCOM MASTER" hehehe.. everyone enjoy the pics now. i know the pics are not enough. but i am having some problem with my camera, once its fixed i will post more.

Comments

wh0kn0wz said…
"WELCOME MASTER" hmm sounds just right... should be a sexy female voice...
pix3latedpic said…
yea it should be a hot female voice. Then only ppl will like it rite.

Popular posts from this blog

SIMCOM SIM900A fixed

Since everyone is interested in this post and lots of request comes to get the firmware, i have put a link so that everyone can download it easily. SIMCOM 900A firmware Its been a while that i was trying to fix the SIM900A GSM module. This module support local GSM band but after some researches it was concluded that it is carrier locked :(. After long conversion of days to actual chip manufacture SIMCOM, they told it can be fixed by updating its firmware to latest original version but unfortunately they don't provide firmware to small parties. I never stop trying to get the firmware and SIMCOM again replied, this time they said contact local SIMCOM supplier and request for firmware. But this little Maldives don't have SIMCOM or any electronics manufacturer. So i contacted my friend coody from NOA LABS/Smart prototyping (a friend in china) and told him to help me. I explained him what to do so he can communicate with SIMCOM in china. Finally he sends and email saying that...

Clover Display M302 hack

Its been a while i have this LCD and today i thought of connecting the LCD display to Arduino. Unfortunately i could not found any pin outs of this from any where and from the manufacture. Actually this is very old model which i got from old FAX machine and this display is a very cheap from online sources. Clover Display M302 PCB Ver 1.0 (16x2) which has 10 pin flat cable. After researching for a while from the internet i have seen in many forums people are asking for help on how to connect it and what is the pin configurations? so i thought of helping them as well as my self at the same time. After going through some of my old collections of Russian data of displays and things i found a basic diagram of how 10 pin LCD display configuration.  PIN1   - VSS PIN2   - VDD PIN3   - CONTRAST PIN4   - RS PIN5   - R/W PIN6   - ENABLE PIN7   - DB4 PIN8   - DB5 PIN9   - DB6 PIN10 - DB7 I tried these configuration...

Turning a TP-LINK TL-MR3020 into an Audio player, stream player etc... you name it..

Its been a while i have been messing with TP-LINK TL-MR3020 router. Before with couple of modifications to hardware and software i made a temperature monitor with room light controller via a custom web interface. If you view below links you will have an idea. http://pixelatedpic.blogspot.com/2013/01/openwrt-on-tl-mr3020-controlling-arduino.html http://pixelatedpic.blogspot.com/2013/04/openwrt-on-tl-mr3020-controlling.html This time i flush the TL-MR3020 with Openwrt. After couple of usb packages and audio packages i just plug in the USB sound card (which was given by whoknowz -  https://www.facebook.com/nashith ) to the router. When the USB sound card is detected from the linux, you can check by command dmesg. Then install the madplay or any player you prefer. I installed madplay because it play audio streams and play local files. For test i played the audio stream from atoll radio and it works great. Just ssh the router and pass this command wget -o - http://radioatoll.s...